CONTINUOUS INTEGRATION
At this point, you have already created, executed and debugged your tests. They are now ready to be used for your project's quality assurance. Also, if you use a Continuous Integration system, you may wish to take advantage of automatic test execution, instead of running tests manually using the UI.
Workflow
Taking into account that Continuous Integration is a process running on a dedicated machine, you will need to follow these steps.
Copy your tests to the server.
Since tests are JavaScript files, this is a simple file copy-paste operation.Setup TestCafe on the server.
This only requires a single line in the command prompt.Write a Node.js application that runs the tests and logs the results.
The TestCafe provides a dedicated Continuous Integration API allowing you to select and run tests, track their execution, and specify target browsers. You can also take advantage of Node.js to analyze the test results and log them as required.Call the application from your Continuous Integration system.
Once again, this only requires a single line in the command prompt.
Setup on the Server
Using TestCafe with a Continuous Integration system suggests programmatic usage instead of UI access. This means that you can use a simpler setup path: install TestCafe directly as an npm module. For this purpose, first switch to the directory in which you will keep the applications that launch tests. Then, install the module using the following command line.
npm install testcafe@15.1.x
Note that you can use TestCafe Settings when you install TestCafe on your personal computer. However, you can skip this step if you specify these settings programmatically, as shown in the next section.
Sample Testing Application
First, create a new JS file in the directory in which you installed the TestCafe (or any directory if you enabled global access) and then create a Node.js application.
Below, you will find a very simple Node.js application that you can use to run tests from a specified directory. Test execution results are logged into the console.
var TestCafe = require('testcafe');
var testCafe = new TestCafe (
    {
        controlPanelPort : 1337,
        servicePort : 1338,
        testsDir : 'D:\\TestCafe-13.1\\tests',
        browsers : {
            'Mozilla Firefox': {
                path : "C:\\Program Files (x86)\\Mozilla Firefox\\firefox.exe",
                cmd : "-new-window"
            }
        }
    });

var runOptions = {
        workers: testCafe.listConnectedWorkers(),
        browsers: testCafe.listAvailableBrowsers(),
        emulateCursor: true
    };

testCafe.runTests(runOptions, function () {
    testCafe.on('taskComplete', function (report) {
        console.log(report);
    });
});
Test execution results can also be saved in the Nunit, Junit and JSON formats that are supported by most Continuous Integration systems (CruiseControl, TeamCity, Hudson/Jenkins, etc.). You can specify the test report's format and path using the reportFormat and reportPath properties of the runTests method's options parameter. Test results will be saved when test execution is completed, before the taskComplete event is raised.
Alternatively, you can handle taskComplete and taskUpdated events to save the test results.
For more information, refer to the Comprehensive Reference on Continuous Integration API
Running the Application
Whatever continuous integration system you choose, you will run your tests using shell commands. Use the standard syntax for Node.js applications - Node.js executable with the application file as the command line parameter. (If Node.js is not installed globally, you will need to copy its executable to the directory that contains your application files.)
node testcafe_getting_started.js
Remote Workers
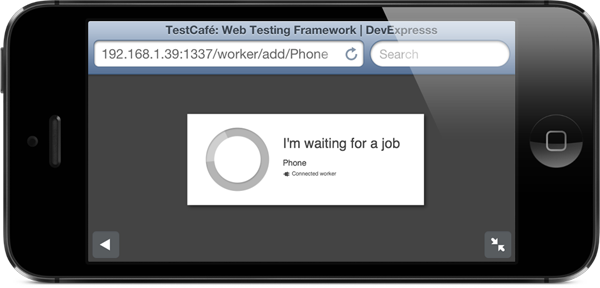
To connect a remote computer or mobile device to the TestCafe that's running on a Continuous Integration server, navigate the browser on your device to the following URL :
http://<hostname>:<controlPanelPort>/worker/add/<workerName>
hostname: Continuous Integration server's hostname. This value should match the hostname you specified in the TestCafe Settings or in the TestCafe constructor.
controlPanelPort: TestCafe's Control Panel port value. As described above, this value can either be specified in the TestCafe Settings or passed as a TestCafe object constructor parameter.
workerName - the name that you wish to assign to the connected worker.
When you navigate to the URL above, your remote browser will automatically become a connected worker.
Technically, the newly registered worker will be included in the list returned by the listConnected Workers() method. Note also that TestCafe raises specially designed events each time a worker is connected or disconnected, so you can respond as needed.