GETTING STARTED GUIDE
This guide provides you with step-by-step instructions on how to create a functional web test with TestCafe. You will learn how to record a test, create an assertion, run the test on multiple browsers and view test results.
Setting up a test project
A TestCafe project is just a file system directory used as the root of your test-related workspace.
A project contains test fixtures (JavaScript files with *.test.js extension) which you can organize into subdirectories, if required.
A test fixture can contain one or more tests for a single specified target URL. Therefore, you will usually have one test fixture per website page/route.
Creating a project
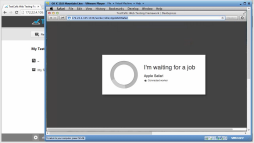
Start the TestCafe application. TestCafe's Control Panel will be automatically opened in the default browser.
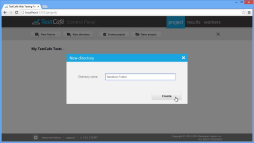
Initially, there are no projects within the Control Panel. Thus, you have to create a new project. Name the project Getting Started and place it into the user home directory (for example).

Creating a directory in the project
It is always a good idea to organize tests into directories with meaningful names.
Create a new Sandbox Folder directory to use as a container for several educational tests that you will create later on.
Creating a test fixture
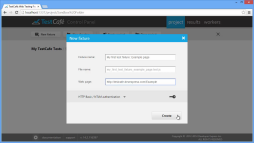
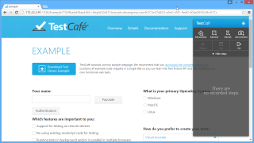
The next step is to create a test fixture that will contain tests for a specific web page - http://testcafe.devexpress.com/Example.
Give the fixture a name, e.g., My first fixture.
Note that you can name a fixture using narrative form and can even use punctuation.
TestCafe will automatically generate the filesystem-compatible file name (in your case, it is my_first_fixture.test.js).
Recording a test
TestCafe is shipped with a test recorder that allows you to record tests visually without dealing with the test code. After you click a fixture's Rec button, a browser loads the tested page and opens the recorder to create a test. A TestCafe test consists of the steps. Each step may contain an action or (one or more) assertions. An action emulates an end-user interaction with a web page, while an assertion checks whether or not the performed interaction has led to the desired result.
Recording test actions
Once you begin a recording, the recorder will automatically track all your interactions with the page and convert them to action test steps. Note that you can delete, edit or reorder the recorded steps.
Creating an assertion test step
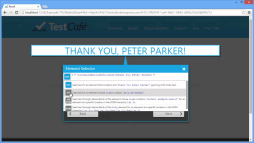
Record a test step that checks whether the name typed into the Your name: input before the form submission is equal to the name displayed in the greeting text after the form submission. For this purpose, create an equality assertion.
Choosing an element for assertion
First, select a page element whose text you need to check.
TestCafe uses jQuery and CSS3 selectors to determine elements on a page.
The recorder will initially suggest a selector that identifies an element by the text it contains (the $(":containsExcludeChildren(Thank You Peter Parker)") selector).
However, the element text is just a value that you are going to check in an assertion.
So it is better not to use the element text as an identifier, but to choose a selector with other element characteristics.
Select an element identified by its CSS class instead (the $(".article-header") selector).
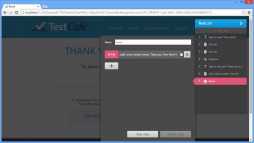
Choosing an element property for assertion
Next, choose an element property whose value to check. In this case, it is the text property. Then, type an expected value and close the dialog.

Play back the recorded steps
Now, play back the recorded test before exiting the recorder. This is good practice because once you exit the recorder, the recorded steps will be converted to the test code, and you will not be able to edit them visually anymore. You can see that the test failed on the assertion step. This is because the closing exclamation mark was not added to the expected value.
Correcting the failed steps
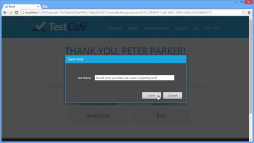
TestCafe allows you to fix the failed test step. This time, use a specific button - Copy actual value to expected - to avoid expected value mistyping. Then, replay the failed step to ensure that everything works as expected.

Saving the recorded test
After a successful playback, you can save the test. Give the test a name, using BDD-style naming: My first test.
Similar to test fixtures, you can use narrative names for tests. Once you exit the recorder, the test will appear in the project. Congratulations, you have just created your first test!
Running a test
TestCafe can run tests in multiple browsers simultaneously. A browser window/tab in which tests are running is called worker in TesCafe. Note that to run TestCafe tests, a worker tab should be active and its browser window should not be minimized.
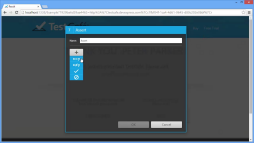
Running a test in multiple browsers
When you press the Run button, TestCafe will ask you where you would like to run the test. As you can see, TestCafe automatically determines browsers installed on your machine. TestCafe will automatically open the chosen browsers and start test execution within them. When the test task is accomplished, the browser windows will be closed by TestCafe.

Getting test results
You can review a complete test result report within the Control Panel's Results tab. Note that report information is updated on-the-fly while tests are running.
Running tests on remote devices
TestCafe can run tests on any remote device (including mobile phones and tablets) with minimum setup. The only requirement for a device to run TestCafe tests is that the device should have network access to the TestCafe application.
Setting up network preferences
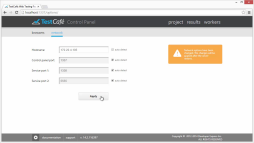
At first, you need to make the TestCafe application visible for external devices.
By default, TestCafe runs using the operating system hostname, but this name might be inaccessible within private networks or through the Internet.
Therefore, it is better to use an accessible device address (such as a network static IP address, if any) as a hostname.
Once you have changed TestCafe network settings, you need to restart the TestCafe application for them to take effect.
After that, the TestCafe Control Panel can be accessed using http://specified_ip_address:1337.
Running tests on a remote machine
Run tests on a remote MacOS machine. Open the TestCafe Control Panel in the MacOS Safari browser (using the URL from the previous step) and navigate to the Workers tab. Here you can connect the Safari window as a worker in one click. After that, the Safari is available as a connected worker in a TestCafe dialog that runs tests.
Running tests on mobile devices
Running tests on mobile devices is even simpler. Just scan a QR-code in the Control Panel's Workers tab by using your mobile device and open the encoded URL in the device browser. Now, the mobile device browser is available as a connected worker in the test run dialog.
